Adding & Managing Trucks & Haulers 🎥
Fast-Weigh Web Portal
Before new Trucks can be added to your Fast-Weigh system, you must have one or more Haulers to attach them to. In most cases, the Hauler is a carrier, trucking company, or customer who owns the truck(s) you will be ticketing. You can also think of each hauler as a folder that one or more trucks belong to.
- All trucks must be assigned to a Hauler. In most cases, the Hauler is a carrier, trucking company, or customer who owns the truck(s) you will be ticketing. You can also think of each hauler as a folder that one or more trucks belong to.
- One Hauler can have an unlimited number of Trucks attached to it.
- Even if a truck stands alone and does not belong to a larger trucking company, you will still need to create a hauler for it.
- All Hauler IDs and Truck IDs must be unique. Hauler IDs can be up to 20 characters in length. Truck IDs can be up to 10 characters.
 Please use the Name field for the full hauler name
Adding & Managing Haulers from the Web Portal
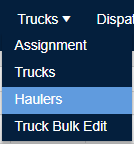
Go to Trucks > Haulers.
Click the [+New Hauler] button or edit and existing Hauler by clicking Edit.

Hauler ID: The shorthand ID for the Hauler
Internal: Your company is hauling the material.
External: An outside company is hauling the material.
The desktop ticketing application will notify the operator during ticketing if the Hauler's insurance is expired
When finished, click Update.
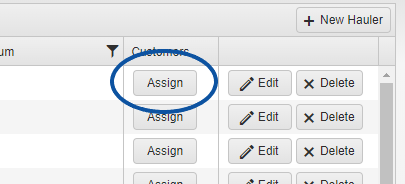 Haulers can also be assigned to one or more Customers.
From the Haulers table, click the Assign button.
Once assigned, when ticketing with one of the Hauler's Trucks, only assigned Customers will be visible.
Hauler Assignment on the Web Portal
Click here for more Fast-Weigh training videos.
 Adding & Managing Trucks from the Web Portal
Trucks for can be added or managed by going to Trucks > Trucks.
Add a truck via the [+New Truck ] button or edit an existing Truck with the Edit button in the Truck Table.
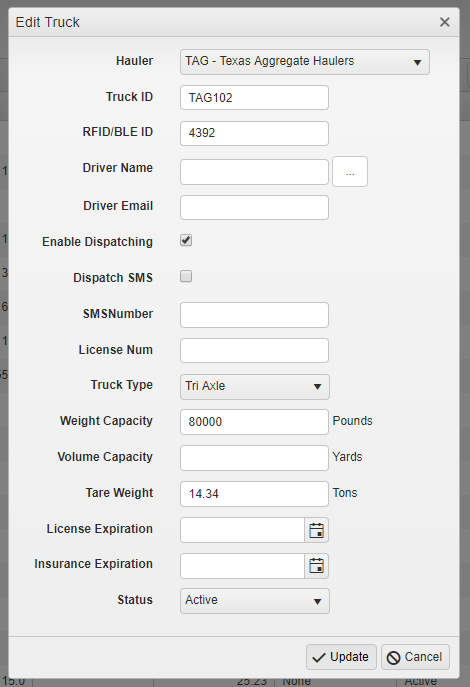 Hauler: The Hauler that the Truck is tied to.
Truck ID: The identifier for the Truck
RFID/BLE ID: If you use an RFID/BLE scanner, you can set the ID here.
License Number: The Truck's license number.
Truck Type: Select the Truck Type, if used
Note: This must be set up beforehand on the Truck Types page under Resources
Weight/Volume Capacity: The capacity for the Truck can be set to prevent overloading.
Tare Weight: This can be set during Truck creation, and edited at any time.
License/Insurance Expiration: A field to store License/Insurance expiration dates.
Status: Set to Active to be able to ticket the Truck.
Note: If you cannot locate a truck at the desktop scale app, check the Web Portal to see if it is Inactive.
When you're finished adding or editing a truck, click Update to save your changes.
Trucks and Haulers may also be managed from the Fast-Weigh Desktop scale house app. Any tare weights captured at the scale house will be synced to the Web Portal.
 NOTE: The Driver Profile, Enable Dispatching, and Dispatch SMS features require a subscription to the Fast-Weigh Dispatching module. If interested in this module, contact us at support@tacinsight.com.
Images & documents
Highlighting a truck in the table will allow you to upload relevant images and documents.
These may include truck inspection photos, license and insurance paperwork, or anything else important for truck maintenance and records.
Related Articles
Creating & Managing Dispatches
Fast-Weigh Web Portal To add the Dispatching module to your Fast-Weigh subscription, contact us at 865-219-2980 or support@tacinsight.com Setting up Haulers, Trucks, and Orders for Dispatching Before a truck can be used for a Request, you will need ...Adding & Managing Drivers
Fast-Weigh Web Portal Driver information can also be used in the Dispatching module and SMS text message alert system. Adding New Drivers Navigate to Dispatching >> Drivers Click the [+New Driver ] button. Fill in your driver's information. Required ...Adding & Managing Tax Codes 🎥
Fast-Weigh Web Portal Tax Codes Click here for more Fast-Weigh training videos. Define all tax codes used within your company’s various locations. Tax codes should correspond with those set up in your third-party accounting system. If your ...Adding & Managing Products
Fast-Weigh Web Portal Product Categories Product categories are useful if your company has a large number of products that need to be organized by type. Categories can be used to separate reports to show broader sales comparisons. Note: Product ...Adding & Managing Locations
Fast-Weigh Web Portal Fast-Weigh has a 3-tier operating location structure: Regions, Locations, and Yards. This allows flexibility for companies of all sizes to manage their production. You may have as many or as few of each structure as you need to ...