Adding & Managing Customers
Fast-Weigh Web Portal
You can manage your entire customer list from the Customers section of the Web Portal. This includes full contact information, payment terms, pricing level, and credit status.

If your organization will be using direct QuickBooks Online integration, click here for instructions on how to add customers directly from QuickBooks Online.
Adding & Managing Customers
- Navigate to Resources > Customers.
- Click the [+ New Customer] button to add a new customer profile.
Building Customer Profiles
 Required fields are notated below with an asterisk *
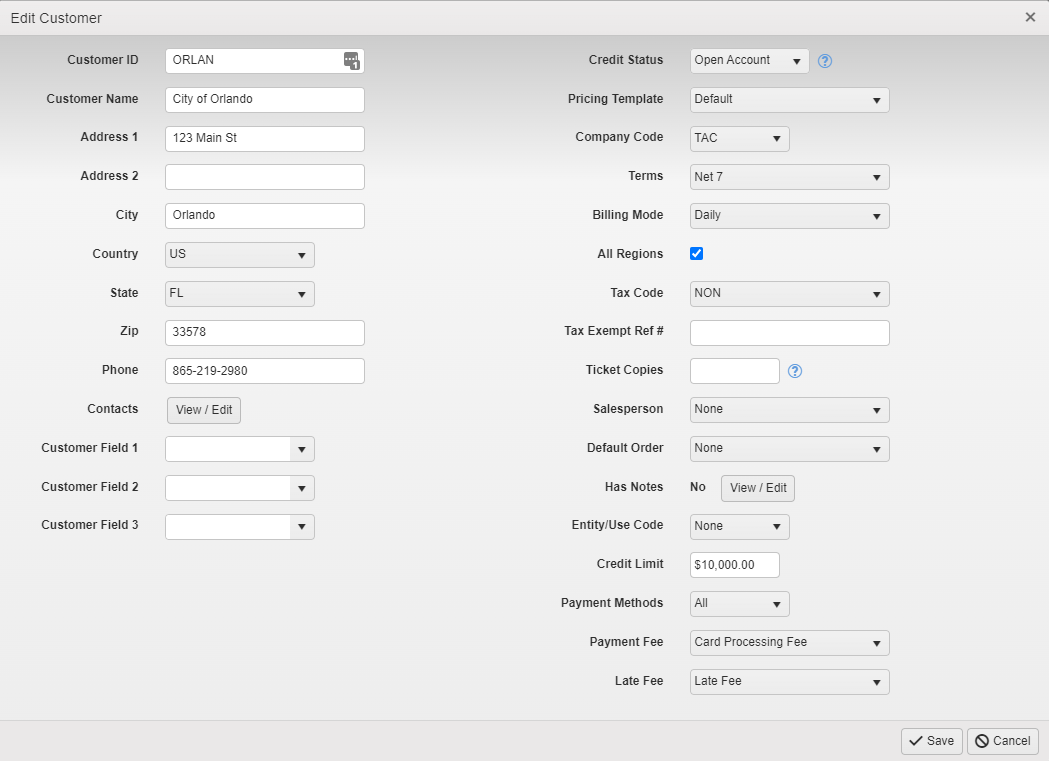
- * Customer ID: This should be a short-hand code that is no more than 10 characters in length.
- * Customer Name: The full customer name, no more than 50 characters in length.
- Address: The main street address of the customer (for your reference).
- Phone: A main phone number for the customer.
- Contacts: A space to store the customer contacts' names, emails, and phone numbers.
- Enter the contact's Name, Email, and Mobile Phone Number.
- Select the Distribution options for Invoice Emails, AR Statement Emails, and Ticket Notifications. The customer contacts' email or mobile phone number will then be used any time you initiate Invoice distribution, AR Statement distribution, or create a ticket for that customer.
- The Contact info can also be used for Quote Distribution.
Please note that Ticket Notifications require the Notifications Module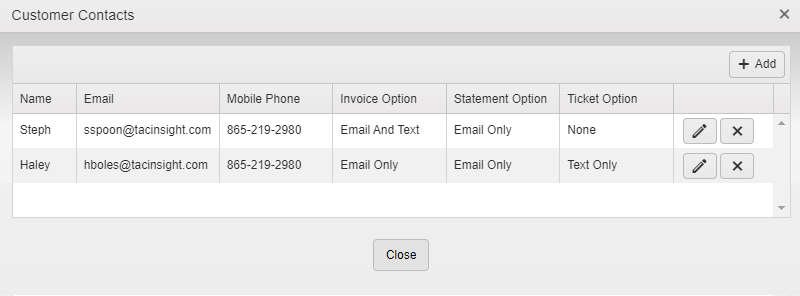
- User Defined Fields: Setup under Gear Icon (top right) > User Defined Fields. (See more at our article on UDFs)
- Credit Status: This is used to set a default payment type for a customer.
- Open: New orders default to Charge Hide $ and all active orders set to Charge Hide $ payment type.
- Cash: New orders default to Cash and all active orders set to Cash payment type
- Do Not Sell: Adds (DNS) to the customer name, new orders default to Inactive status, and all Active orders are set to Inactive status.
Tip: When the Credit Status is switched from Do Not Sell, all Inactive orders are set to the Active status.- Pricing Template: The default price template for new orders created for the customer.
- Company Code: This 3-digit code is set under Portal Settings.
- Terms & Billing Mode: The payment terms for the order.
- Regions: Allows you to set if a customer is available for selection on Orders in all regions, or only within selected regions. By default, the All Regions box is checked and must be unchecked to select specific regions.
- Tax Code: The tax code used on Orders for the Customer.
- Ticket Copies: If an order requires more copies of the ticket than normal, you can set how many additional copies should be automatically printed here.
- Salesperson: If this Customer has a default Salesperson that manages their account, you can set this here.
- Default Order: Set the default order used during ticketing on the Desktop Ticketing App for the selected customer. This option is only visible when an order exists in the system for the Customer.
- Has Notes: This can be used to track internal notes about the Customer.
- Credit Limit: $ Amount for Monitoring, Reporting & Dashboards - A/R Module Enabled Only
- Payment Methods: Default Methods the customer is allowed to pay by. - A/R Module Enabled Only
- Payment & Late Fee: Default Fees applied the customer. - A/R Module Enabled Only
- Can be setup under Resources > Billing > Invoice Adjustment Types
Importing External Customers (from Outside Fast-Weigh)
- Navigate to Resources > Customers
- Click the [+ External Customers ] button.
- Upload your Customer import file.
Click the following link for a sample Import file.
- Configure the parameters below the table
- Click Save to add the imported Customers into Fast-Weigh.

Related Articles
Adding & Managing Tax Codes 🎥
Fast-Weigh Web Portal Tax Codes Click here for more Fast-Weigh training videos. Define all tax codes used within your company’s various locations. Tax codes should correspond with those set up in your third-party accounting system. If your ...Adding & Managing Trucks & Haulers 🎥
Fast-Weigh Web Portal Before new Trucks can be added to your Fast-Weigh system, you must have one or more Haulers to attach them to. In most cases, the Hauler is a carrier, trucking company, or customer who owns the truck(s) you will be ticketing. ...Adding & Managing Payment Terms & Billing Modes
Fast-Weigh Web Portal Set up your payment terms and billing modes. These terms and codes should be set up in conjunction with your Accounts Receivable Terms Codes. If your organization will be using direct QuickBooks Online integration, click here ...Adding & Managing Sales People
Fast-Weigh Web Portal The Salesperson feature can be used to tie your salespeople to their orders and customers within the Web Portal. Once you setup your salespeople, you can easily assign them to Customers, Quotes, and Orders, as well as view ...Adding & Managing Products
Fast-Weigh Web Portal Product Categories Product categories are useful if your company has a large number of products that need to be organized by type. Categories can be used to separate reports to show broader sales comparisons. Note: Product ...